I used some really rough measurements & a lot of guessing to put this top together. So please remember that the measurement I give & use in the below are only a guide. They were suitable for my child but for a good fit be sure to measure up your child so that they will be correct & well fitting for you.
So to start off I measured my daughters chest & then I added some measurements to the width of that amount again so that I'd have some gather.
So for example:
Chest measures: 60cm (23.5inches)
Extra (for gathering): 28cm (11inches)
Add seam allowance: 2cm (3/4 inch) x2
60cm + 28cm + 4cm = 92cm (36 1/4 Inches) This will be your Width.
As for your length, this too will be what suits your own child's measurements & whether you'd like to make a midriff like me or a full length top .
For my child's midriff top the cut out length was 25cm (9 3/4 inches) This included the seam allowance.
You'll now have a rectangular fabric piece which will become your top.
Now find the middle of your rectangle, you can do this by folding your fabric piece in half width wise. Once you have the middle, cut your fabric in half so that you now have a two pieces, a front & a back.
Now to cut out your sequin fabric. I chose to have the sequins to only cover the front piece of fabric. For this, simply re-measure the width of you main satin piece & cut in accordance. As for the length of the sequin fabric I chose to cut it a little shorter. So for example my sequin fabric measured 48cm (19 inches) wide & 11cm (4 1/4 inches) in length.
Once you have your satin piece & sequin pieces cut out, lay you front piece down (face up) the then place your sequin fabric on top (face up). I like to leave an even amount of satin fabric poking out at the top & the bottom. This makes it easier for shirring the fabric later on. For my top I have 7cm of satin fabric on the top & the same for the bottom. Once you have worked this out & got it laying correctly, Pin the sequin fabric in place & then sew, sewing as close to the edge as the fabric allows. (Please Note: The sequin fabric I chose a fabric that doesn't fray).
Once your sequin fabric has been sewn into place, get your back piece & place it on top of your front piece Right sides together.
Sew a 2cm seam down each side seam.
And then serge your side seam edges.
Your rectangular piece is now sewn as a tube.
At this point I like to hem the top & bottom of the top. You can do this several ways:
1. Serge around the top & bottom & then fold over (inwards) 2cm (3/4 inch). Press with a hot iron & then sew into place.
2. Or you can fold over 1/4 inch & press & then turn over again 3/4 inch, press & then sew into place.
3. Hem with a hemming foot attachment if your machine has one.
Once your top has been hemmed top & bottom it's time to shirr in the elastic. Shirr around the whole top, front & back.
I shirr 3 rows of elastic into both the top & bottom of the top starting 2cm (6/8 inch) down. Use your sewing foot as a guide when sewing.
Here is a link to a quick tutorial on shirring if you are unsure on it or haven't done it before...Shirring really is easy once you get the hang of it. How to Shirr Fabric
Shirring Guide
Your tubular top will now be taking form & the top & bottom will bunched up with the shirring.
At this point I like to go over the shirring with the steam iron. The steam from the iron will help shrink the shirred elastic giving it a tighter look.
Now for the shoulder traps:
I cut 2 strips of the satin fabric out at 47cm (18 1/2 inches) Long & 7cm (2 6/8 inches) wide. For hemming the edges I've used my sewing machines hemming foot which sews the tiniest hems of about 1/4 inch. If you do not have this attachment for you machine I would suggest cutting your fabric piece an extra 1cm (3/8) wider so that you can turn your hem piece under 1/4 inch twice & then press & sew into place.
Once your hems are sewn on both sides cut 2 equal lengths of sequin fabric approximately 1.5cm (1 inch) wide.
Now set your machine back to shirring mode & place your elastic bobbin back into your machine.
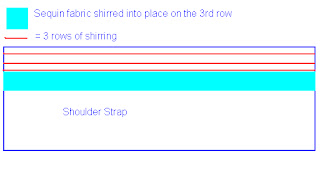
Starting 1.5cm (4/8 inch) down, start shirring your shoulder trap right along to the end. Turn & shirr back down to the start again. But this time keep the shirring much closer together, about 0.5cm (3/8 inch).
Now you have 2 rows of shirring. On the 3rd row, grab your strip of sequin fabric & shirr that into place as you go along. Once your at the end..back stitch & finish off. Repeat for your second shoulder trap.
Finish off the ends of straps with your serger & then give your shirring a burst with your steam iron.
Now pop your Princess Top onto your child & pin your shoulder straps in the best suitable position. With the straps being shirred it means they can be worn over the shoulder or off the shoulder. Once you've found the best position, carefully remove the top (without pinning your child) & sew into place.....And Wah Lah!!! Your Done...One Easy & Gorgeous Princess Top that your child will play dress ups in over & over again.
Happy Sewing
Love Inge


